In this section we’ll cover most of the features available within the administrative interface.
GENERAL
Dashboard
We’ll split the dashboard in more sections to help ease out explaining each of them.
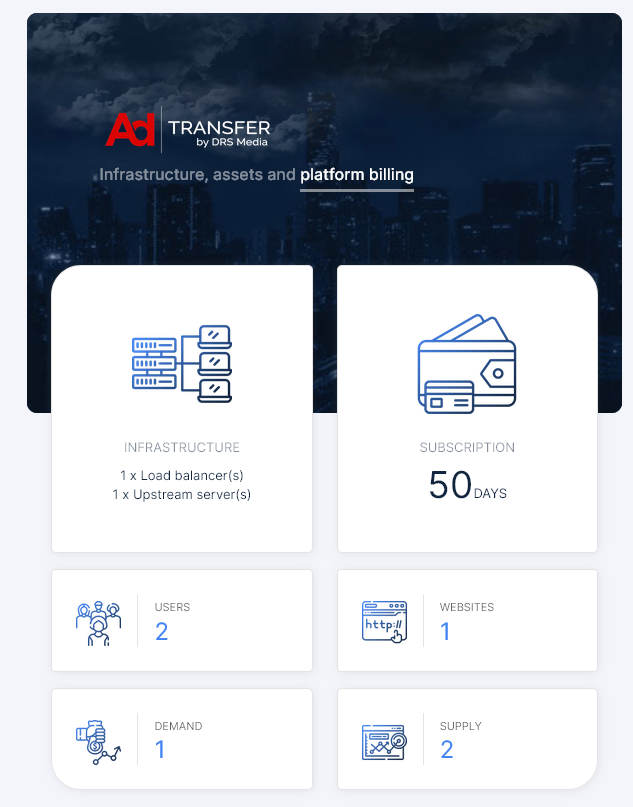
- Information about the platform subscription, infrastructure and properties
- Information about the gains, spendings and profit for the ongoing day, previous day, last 7 days, ongoing month and previous month

- General information about the platform’s members, including their balances

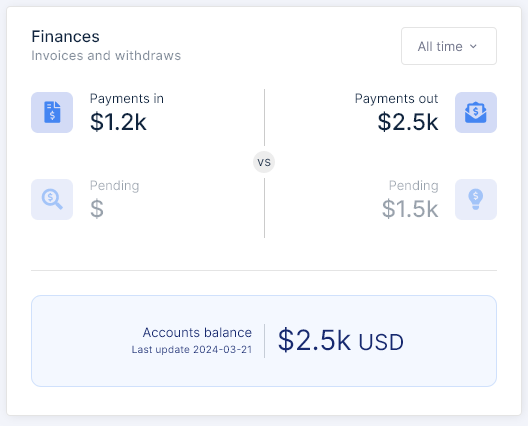
- Cumulative information regarding the payments received, payments sent and users total funds
- Activity log of the most recent actions within the platform. Includes a link to a page which contains the complete activity log

- Gains, spendings and profit for the last 30 days, ongoing month and previous month

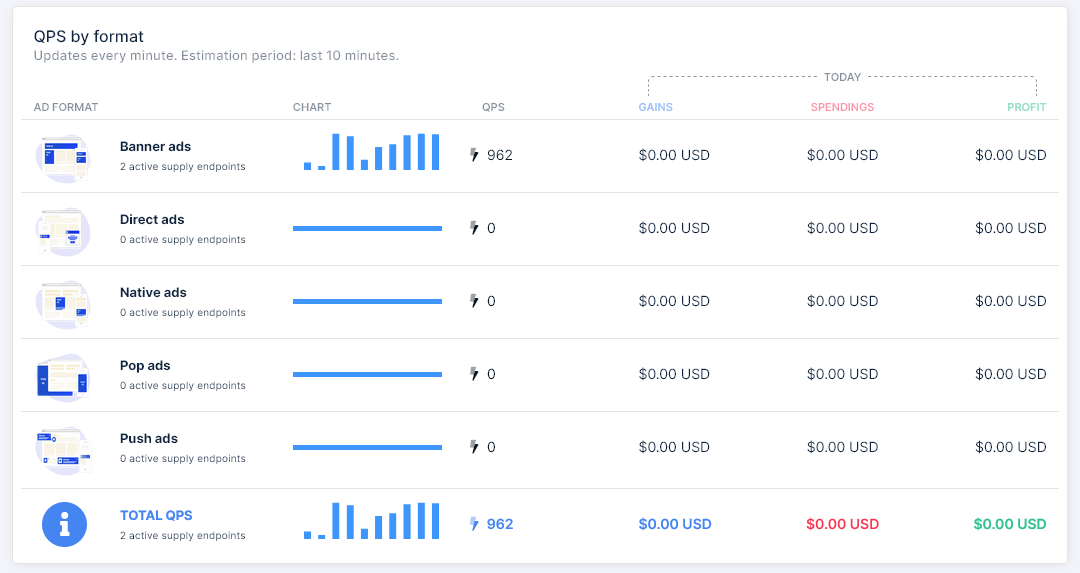
- QPS distribution by format as well as the combined QPS for all formats
- QPS distribution by supply endpoint

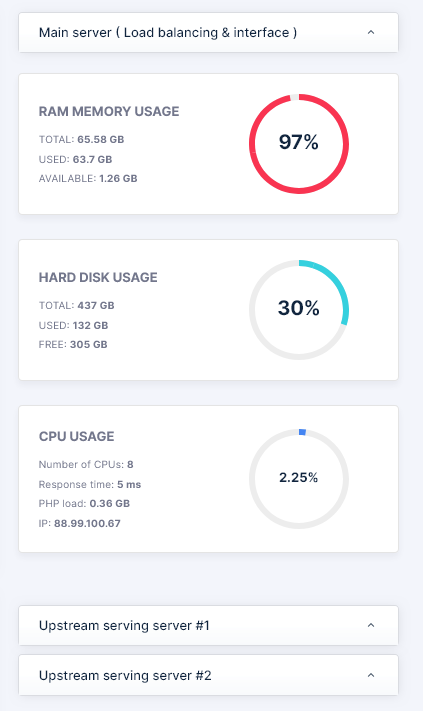
- Infrastructure information which include resources used and server load
.
STATISTICS
Traffic reports
The traffic reports are responsible for displaying information regarding all the platform’s traffic and are divided into 3 sections as it follows:
- The filters

- Report grouping

- The report data
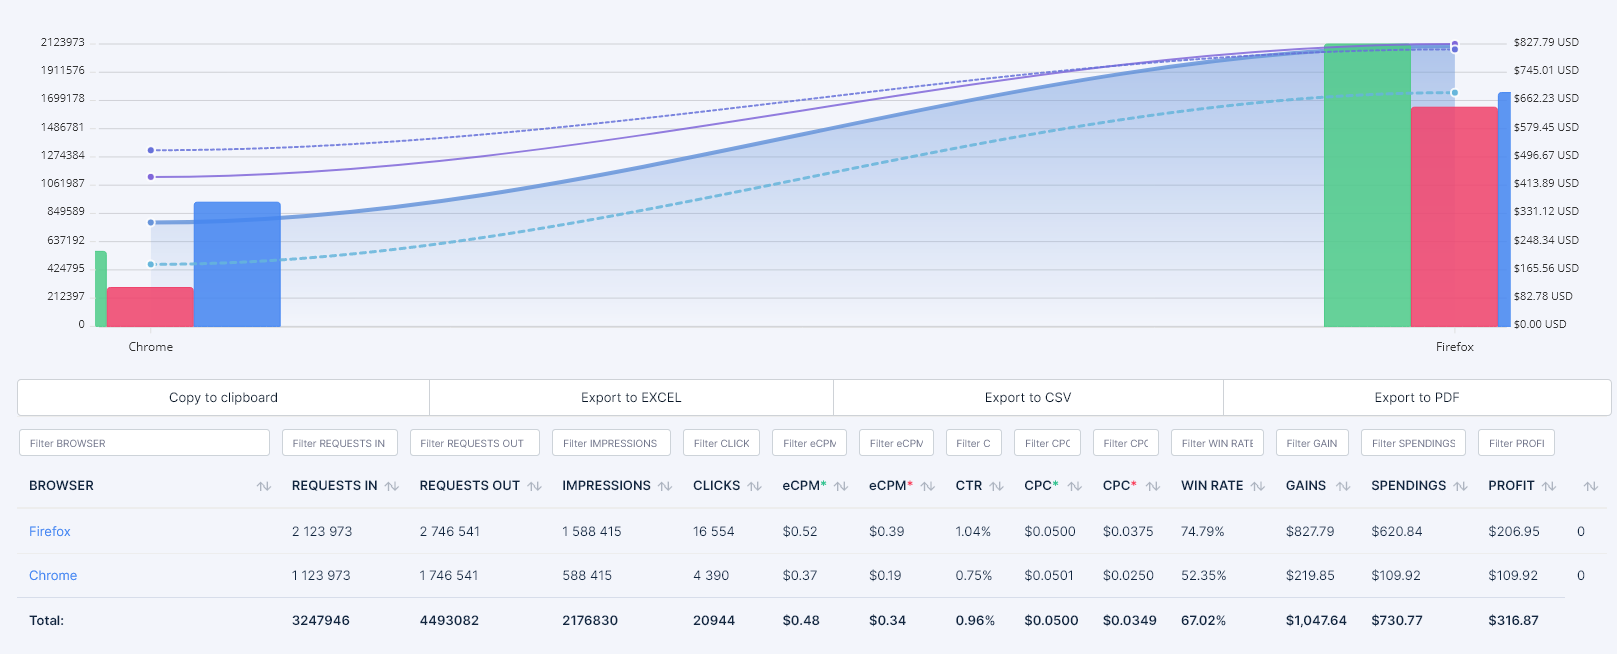
TABLE DATA TERMINOLOGY
| Term | Description |
|---|---|
|
REQUESTS IN |
The number of requests received from supply endpoints. |
|
REQUESTS OUT |
The number of requests made to demand endpoints. Should be higher than the requests in because for each request made by a supply endpoint, 1 or more demand endpoints are interrogated. |
|
IMPRESSIONS |
The number of impressions. |
|
CLICKS |
The number of clicks. |
|
eCPM |
The eCPM calculated based on the gains. Formula : (gains × 1000 / impressions) |
|
eCPM |
The eCPM calculated based on the spendings. Should be lower than the eCPM of gains. Formula : (spendings × 1000 / impressions) |
|
CTR |
The click through rate. Formula : (clicks × 100 / impressions) |
|
WIN RATE |
The percentage of wins compared to the total requests. Formula : (impressions × 100 / requests) |
|
GAINS |
Estimation of your earned income from your demand endpoints. |
|
SPENDINGS |
Estimation of your spendings. This amount is what the users actually receive. |
|
PROFIT |
Estimation of your profit. Formula : (GAINS – SPENDINGS) |
.
Filtered traffic
Also known as the “Error log”, this page displays reports of the redirect-level traffic that was filtered.
In terms of page structure, it shares the same structure as the Traffic reports and has sections for results limiting, filters, grouping, chart data and table data, with the difference that its main focus is reporting the errors logged per inbound traffic. The available error codes can be seen in the table below.
The filtered traffic page also points to a detailed error log which contains the ongoing day data.
ERROR TYPES
| Error | Description |
|---|---|
Invalid click ID | This error refers to clicks and / or visits that were rejected because they were sent to an invalid click ID. The click ID is an unique identifier given to each request and it can only be used once. |
Click ID reused | This error refers to clicks and / or visits that were triggered more than once for a previously used click ID. |
IP mismatch | This error refers to clicks and / or visits in which the IP address used in the request is different than the one used when the redirect takes place. |
Invalid screen size | This error refers to clicks and / or visits in which visitor’s screen width is lower than 300px or the screen height is lower than 400px. |
Connection speed < 3G | This error refers to clicks and / or visits in which visitor’s connection speed is slower than 3G. |
Device RAM < 1GB | This error refers to clicks and / or visits in which the RAM memory of the device of the visitor is below 1GB. |
Invalid navigator platform | This error refers to clicks and / or visits in which the navigator platform of the visitors’ browser could not be retrieved. |
Webdriver enabled | This error refers to clicks and / or visits in which the vistor’s browser runs a webdriver. |
Invalid navigator geolocation | This error refers to clicks and / or visits in which the geolocation of the vistor’s browser can not be retrieved or is invalid. |
Localstorage unavailable | This error refers to clicks and / or visits in which the localstorage of the vistor’s browser can not be retrieved or is invalid. |
Browser cookies unavailable | This error refers to clicks and / or visits in which the cookies of the vistor’s browser are not enabled or are unavailable. |
Browser JavaScript unavailable | This error refers to clicks and / or visits in which the JavaScript of the vistor’s browser is not enabled or unavailable. |
Window history unavailable | This error refers to clicks and / or visits in which there is no window history for the visitor’s browser and / or the visit comes with no previous referrer. |
In-app visit | This error refers to clicks and / or visits in which were triggered inside a mobile app. |
No pixel / Fast click | This error refers to clicks specific to banner, native and push ads that were triggered without displaying the image of the banner, native ad or push ad respectively, or the click was fired less than 1 second after the image was displayed. |
Filtered by 3rd party | This error refers to clicks and / or visits that were filtered by a 3rd party filter. |
Iframe visit | This error refers to clicks and / or visits that were displayed inside an iframe. |
Other | This error refers to clicks and / or visits for other reasons than the ones listed above. |
.
Request log
The request log is an utility page which helps you detect flawed calls from your supply endpoints and allows you to remediate them by communicating instructions to your traffic suppliers or publishers.
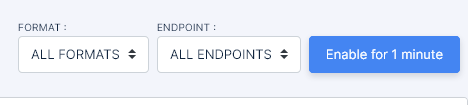
Due to performance issues, the request log is disabled by default can be enabled when needed for a limited period. The feature was developed this way to prevent high stress on your database.
Enabling the request log can be done for a predetermined period of 1 minute, by accessing the status button on the top right side of the page.
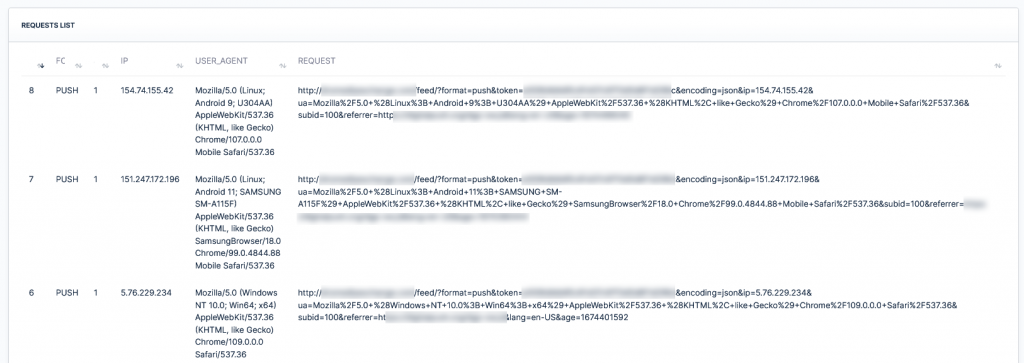
The actual request list contains the following information:
Request ID– Database ID of the field which contains that particular request.Format– The format on for which the request was made.Source– The ID of the supply endpoint which made the request.IP– The IP address for which de request was made.USER AGENT– The user agent for which de request was made.Request– The full URL of the request.
.
Response log
The response logs work in a similar manner to the request logs and allow you to track down the responses received from your demand endpoints.
The response logs can be enabled in the same way the request logs are enabled, for a predetermined period of 1 minute.
These limitations are put in place because of the huge stress that these features put on the database.
.
BUYING / SELLING
DEMAND
New demand
There are 3 types of demand endpoints that can be added:
- XML / JSON feeds ( for banner, direct link, native ads, pop ads and push ads )
- Direct campaigns ( for banner, direct link, native ads, pop ads and push ads )
- oRTB endpoints ( for banner, direct link and pop ads )
Out of the 3 types the one that needs a separate explanation is the feed integration which is explained under the Guides section -> Integrating demand
The rest of the types, are self explanatory and aside from the targeting they contain vastly used parameters such as bids, budgets and limitations.
.
Demand endpoints
The “Demand endpoints” page is home to all your demand endpoints for all formats. The format can be switched using the tabs on the top side of the page and each format tab offers a table view of each demand endpoint information and data as well as access to various options.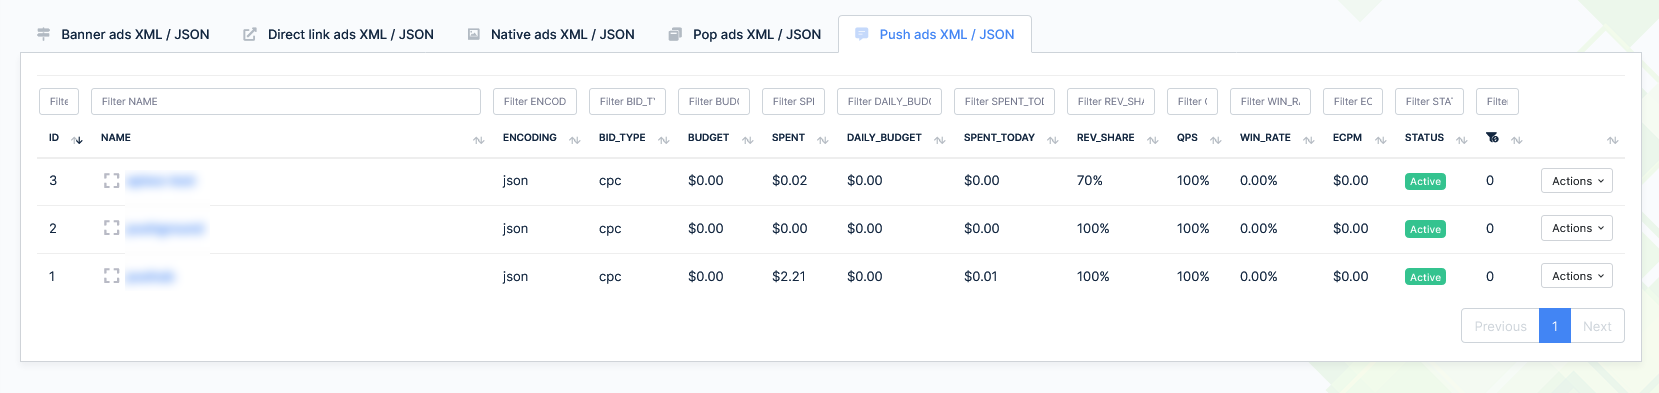
Each format table offers individual column searching with a column specific dropdown select that contains all available values, as well as column sorting and pagination for ease of use.
Each demand endpoint has its own actions as follows :
Activate / Deactivate endpoint– Allows you to instantly pause or activate the endpoint from receiving queries.Detailed view– Offers you a minidashboard containing information about the demand endpoint and quick links.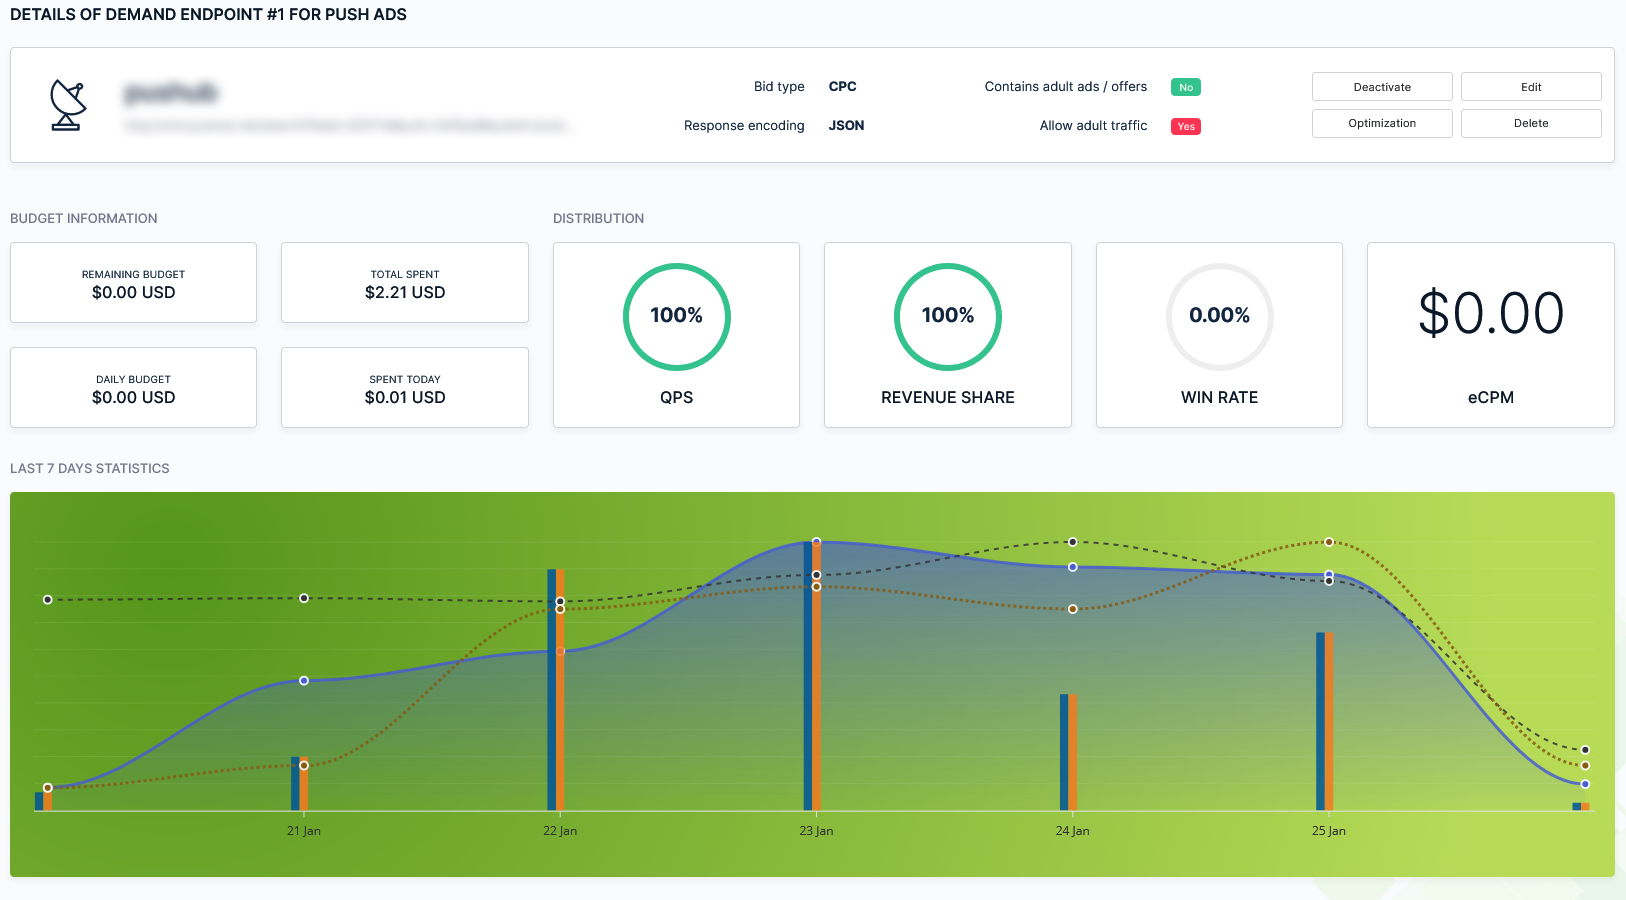
Edit endpoint– Allows you to change information regarding the endpoint as well as targeting options, and targeting options blocked by automatic or manual optimization from the statistics ( See Optimization guide ).
Optimization– Allows you to set endpoint specific optimization rules to block various targeting options based on predefined values. Complete details of the process can be found in the Optimization guideDelete endpoint– Allows you to instantly remove the endpoint. To prevent accidental deletion, a confirmation message will appear before the actual removal.
.
New supply endpoint
Adding a new supply endpoint self intuitive task in which you have to specify the following parameters :
| Parameter | Requirement | Description |
|---|---|---|
Format | REQUIRED | The ad format for which the supply endpoint is created. |
User | REQUIRED | The user ( publisher ) is the owner of the newly created supply endpoint. |
Website | REQUIRED | The publisher’s website for which the supply endpoint is being created. |
Endpoint's name | REQUIRED | The name of the endpoint. Minimum 2 characters, maximum 32. |
Shared revenue | OPTIONAL | The percentage of the revenue which is shared with the user ( publisher ) for this particular endpoint. This value is calculated after the revenue share percentage of the demand endpoint is calculated. This means that if the demand endpoint’s revenue share is 50% and the supply endpoint’s revenue share is 50%, the publisher will receive 25% of the initial bid. |
QPS throttle | OPTIONAL | QPS limit for this endpoint. Please keep in mind that this value limits the number of results the endpoint will be able to retrieve in 1 second. If more calls are made they will not be served, however the server load will still be significantly impacted if the publisher makes more calls than the QPS throttle limit. |
Total spend limit | OPTIONAL | Maximum amount to spend for this endpoint. |
Daily spend limit | OPTIONAL | Maximum amount to spend for this endpoint per day. |
Allow adult campaigns | OPTIONAL | Allow or reject the campaigns and demand points which serve adult related ads for this supply endpoint. |
Contains adult traffic | OPTIONAL | Specify whether the traffic of this supply endpoint contains adult related sources. |
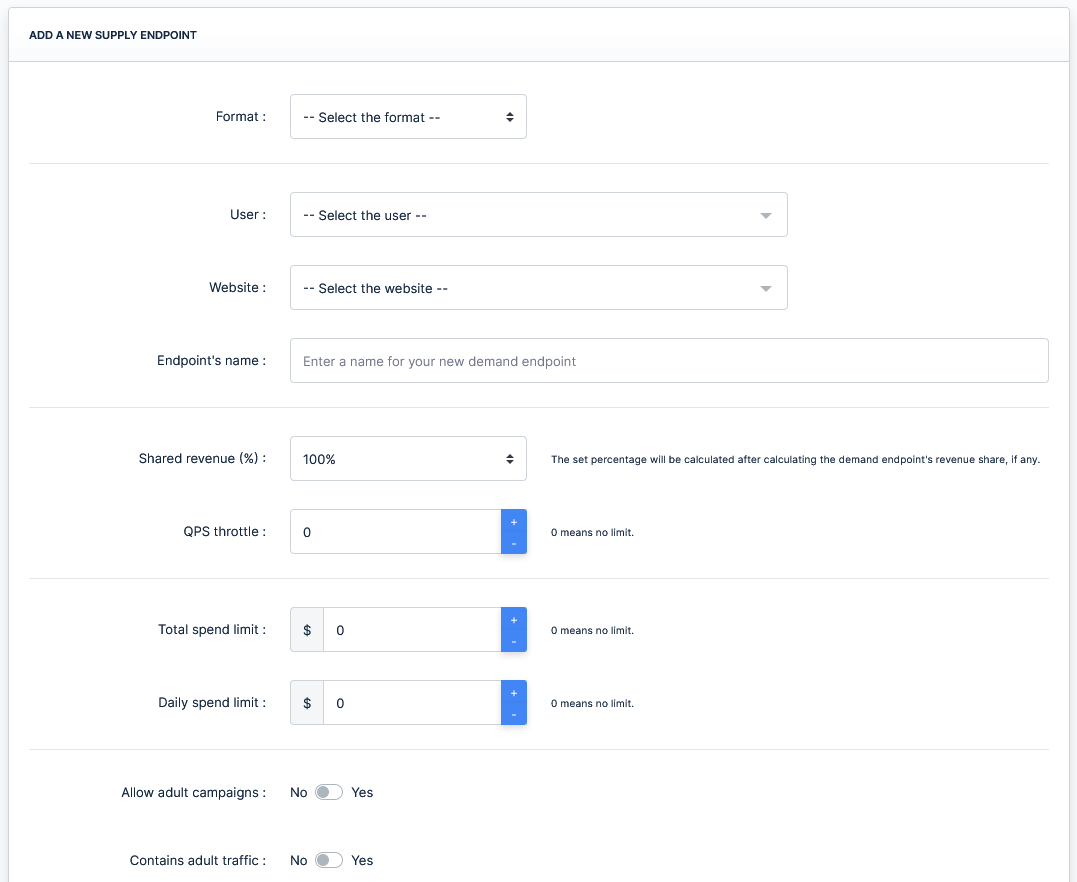
Aside from the parameters listed above, you also have a set of redirect page level filters that you can enable or disable based on your needs per each supply endpoint. The redirect page level filters which can be enabled for each individual supply endpoint are fully covered in the Traffic filters section of the documentation.
After submitting the form, the supply endpoint will be created and you will be given its token and feed URL. Give this information to your publisher for integration.

.
Supply endpoints
The “Supply endpoints” page is home to all your supply endpoints for all formats. The format can be switched using the tabs on the top side of the page and each format tab offers a table view of each supply endpoint information and data as well as access to various options.
Each format table offers individual column searching with a column specific dropdown select that contains all available values, as well as column sorting and pagination for ease of use.
Each supply endpoint has its own actions as follows :
Activate / Deactivate endpoint– Allows you to instantly pause or activate the endpoint’s ability to send queries.Detailed view– Offers you a minidashboard containing information about the supply endpoint and quick links.
Edit endpoint– Allows you to change information regarding the endpoint and targeting options blocked by automatic or manual optimization from the statistics ( See Optimization guide ).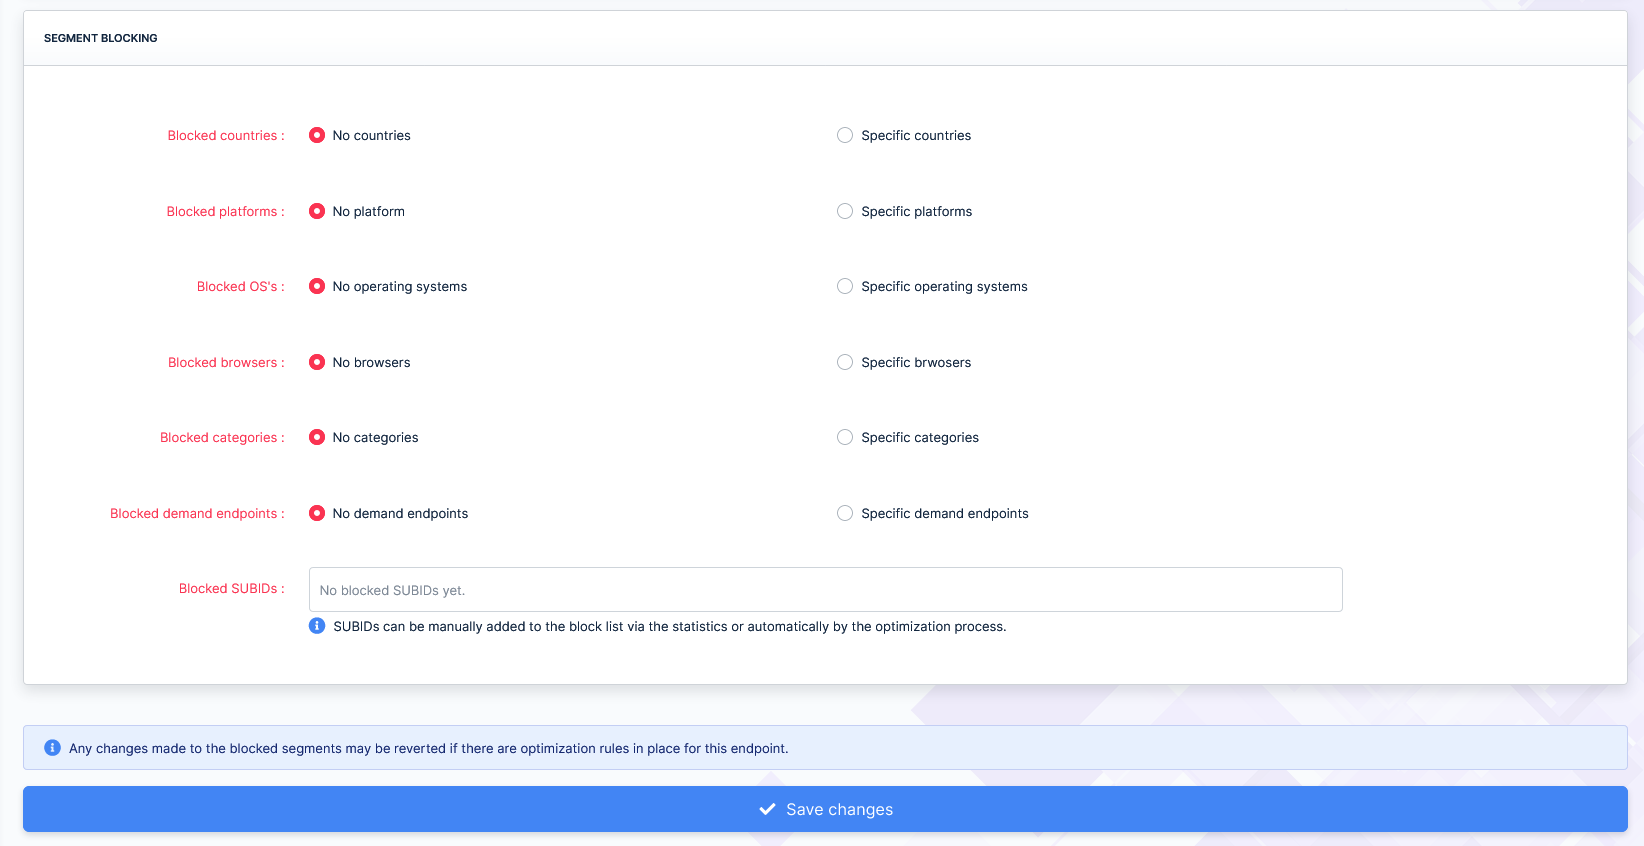
Optimization– Allows you to set endpoint specific optimization rules to block various targeting options based on predefined values. Complete details of the process can be found in the Optimization guideDelete endpoint– Allows you to instantly remove the endpoint. To prevent accidental deletion, a confirmation message will appear before the actual removal.
.
Adding a new user
Adding a new user to the platform is self explanatory as the form that needs to be filled only contains the following inputs :
Username– Unique naming identifier. Must contain between 5 and 32 alphanumeric characters. If the username already exists an error will be thrown.Email– Unique email address assigned to the user. If the email already exists an error will be thrown.Clearance– The user role. For more information please visit User roles.Account manager– Optional. Regular members can be assigned account managers.
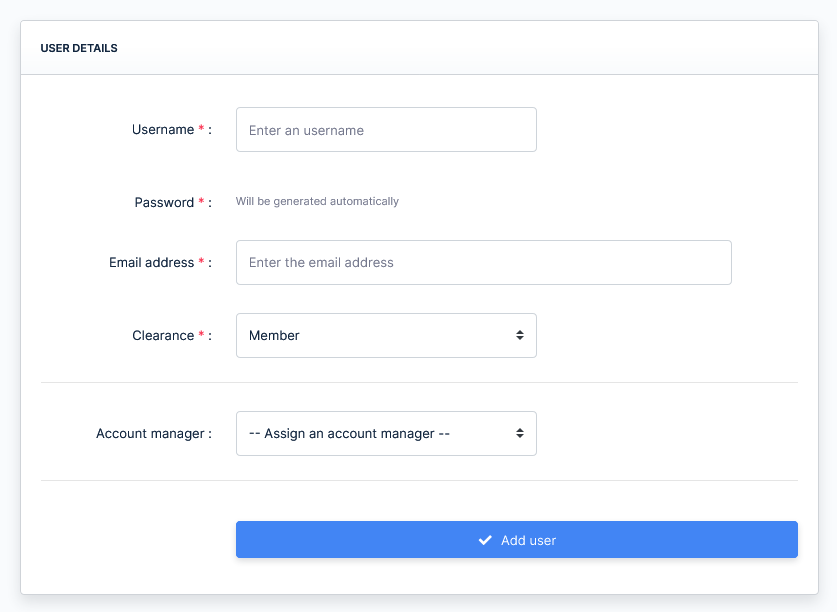
The password for the newly created user will be generated automatically and consists of 16 randomly generated letters, numbers and special characters.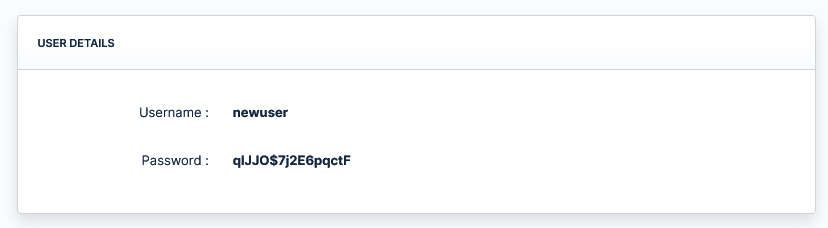
.
Users list
The page containing the list of platform users offers a tabled view of the list which includes column sorting and individual column search with a preset dropdown list containing all values for easy access.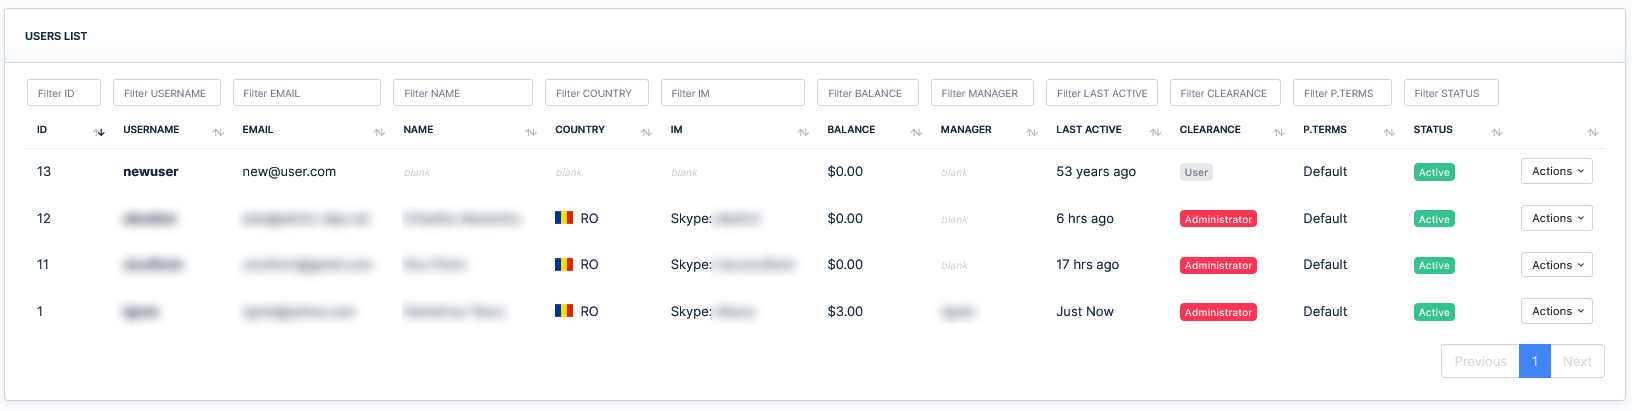
Each individual user has a list of specific actions that can be taken as follows :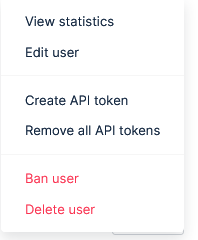
View statistics– A quick link to the traffic reports which will automatically enable the user filter and preselect this specific user.Edit user– Opens a new page which allows user information editing.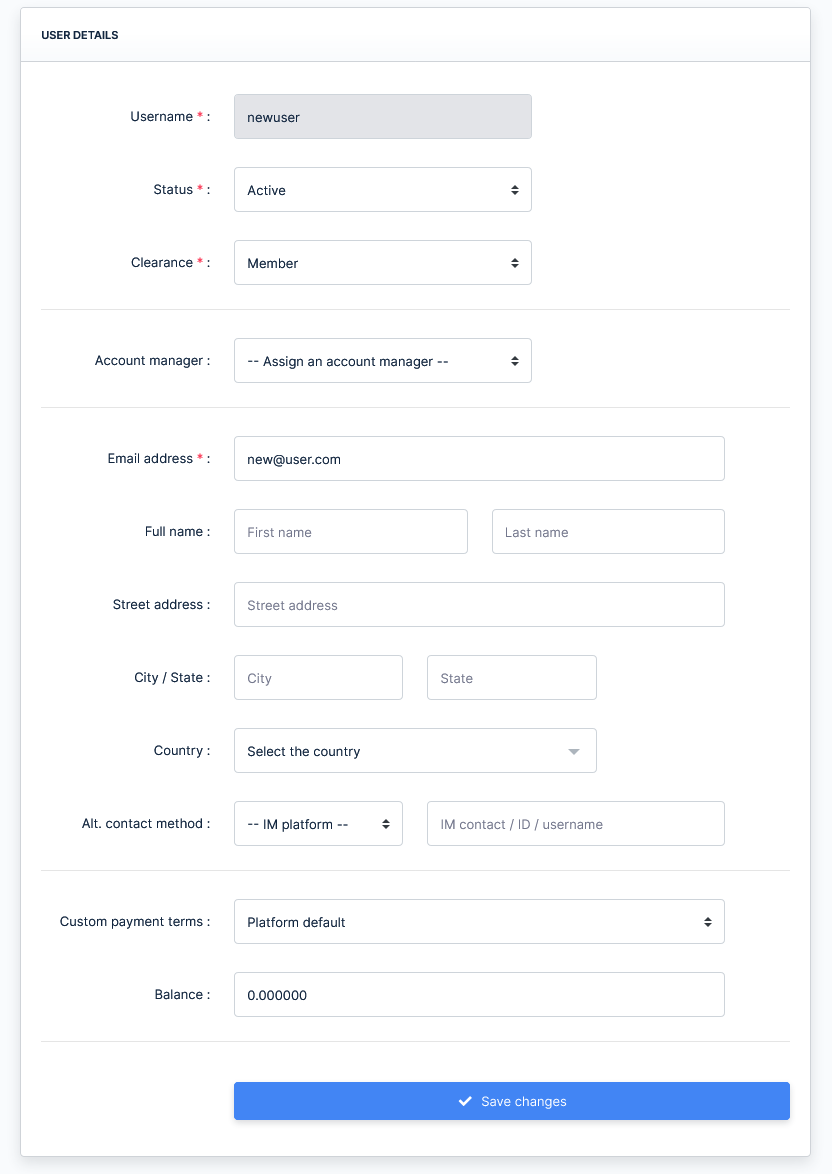
Create API token– Creates a new publisher statistics API token which can be used to pull reports as explained in the integration guides.Remove all API tokens– Removes all the publisher statistics API tokens of this specific user.Ban user– Allows instant termination of the user account. This action instantly stops all feeds and sets user balance to 0. To prevent accidental trigger, a confirmation will appear for this action.Delete user– Allows instant removal of the user account. To prevent accidental trigger, a confirmation message will appear for this action.
.
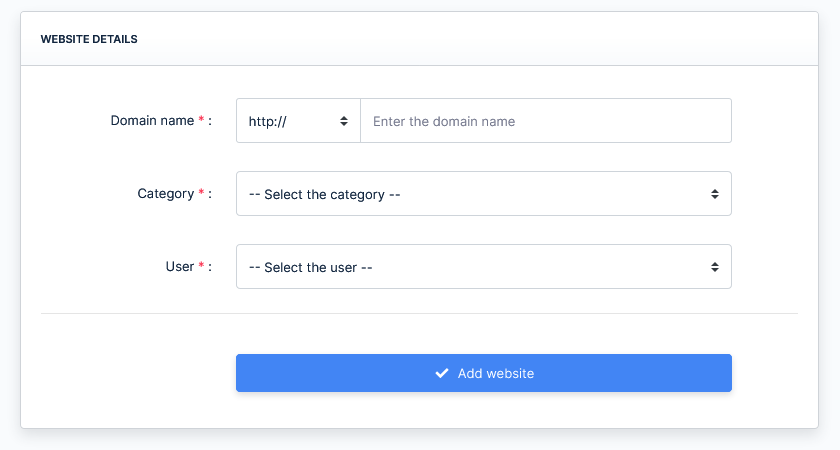
Adding a new website
To add a new website log into your administrative account then in the main menu, under the PROPERTIES section go to the Websites menu link, click to open the sublink and hit “New website” then, in the page that opens, fill the following form fields :
Domain name– Unique domain name. Enter it without the www. part.Category– The main IAB category of the website. Will be used when no category is given within the request for a feed linked to this website.User– The owner of the website.
.
Websites list
The page containing the list of websites offers a tabled view of the list which includes column sorting and individual column search with a preset dropdown list containing all values for easy access.
Each individual website has a list of specific actions that can be taken as follows :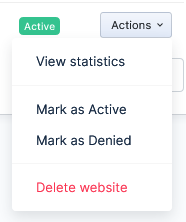
View statistics– A quick link to the traffic reports which will automatically enable the website filter and preselect this specific website.Mark as Active– Changes the status of the website to ActiveMark as Denied– Changes the status of the website to Denied. All feeds created for this website will instantly stop delivering results.Delete website– Allows instant removal of the website. To prevent accidental trigger, a confirmation message will appear for this action.
.
Platform billing
The platform billing page allows you to renew your Adtransfer subscription for your platform to continue running. The page contains information such as :
Platform ID– Informational purpose. An ID used to quickly identify your platform when a payment is made or when contacting an Adtransfer representative.Current infrastructure– Lets you know exactly what servers you have running, and their purpose.Current price / day– Informs you of the costs per day needed to run the platform. As explained in the pricing page, each server costs $10.00 USD / day to run.Days left– Informs you of the amount of days your platform will continue running before a new payment is required.
When renewing your platform subscription, you can get discounts if you extend the period for 60 and 90 days respectively. The discount for renewing for 60 days is 2.50% and the discount for renewing for 90 days is 5.00%.
.
Request a payment
This page allows you to create invoices for your demand partners with ease. Simply fill the form within the page to instantly create the invoice without the need of any 3rd party application. The invoice can be printed after being created.
.
Payments received
The page containing the received payments offers a tabled view of all your sent invoices and includes column sorting and individual column search with a preset dropdown list containing all values for easy access.
Each individual invoice has a list of specific actions that can be taken as follows :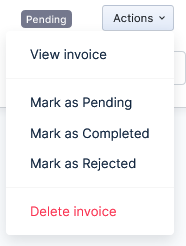
View invoice– A quick link to the actual invoice which includes printing capabilities.
Mark as Pending– Changes the status of the payment to PendingMark as Completed– Changes the status of the payment to CompletedMark as Rejected– Changes the status of the payment to RejectedDelete invoice– Allows instant removal of the invoice. To prevent accidental trigger, a confirmation message will appear for this action.
.
Pending payments
The page contains a tabled view of all your pending payments and includes column sorting and individual column search with a preset dropdown list containing all values for easy access.
Each individual payment has 4 qick access buttons as follows :
Mark as Completed– Changes the status of the payment to Completed.Mark as Rejected– Changes the status of the payment to Rejected. To prevent accidental trigger, a confirmation message will appear for this action.Mark as Canceled– Changes the status of the payment to Canceled. This action returns the funds to the user’s account. To prevent accidental trigger, a confirmation message will appear for this action.Delete– Allows instant removal of the payment. To prevent accidental trigger, a confirmation message will appear for this action.
.
Payments sent
The page contains a tabled view of all sent payments aside from the ones that are pending and includes column sorting and individual column search with a preset dropdown list containing all values for easy access.
A number of 5 actions can be taken for each individual payment :
Mark as Pending– Changes the status of the payment to Pending.Mark as Completed– Changes the status of the payment to Completed.Mark as Rejected– Changes the status of the payment to Rejected.Mark as Canceled– Changes the status of the payment to Canceled. This action returns the funds to the user’s account.Delete– Allows instant removal of the payment. To prevent accidental trigger, a confirmation message will appear for this action.
.
Edit users
We know how tedious it can be to try to edit users one by one, therefor we developed a feature which allows you change the status or modify the balance of multiple users at once. While logged into your administrative account, under the EXTRA section, expand Mass edit, then click Edit users.
In this page there are 4 panels available, each serving a different function.
- MODIFY THE STATUS OF BANNED ACCOUNTS – allows you to switch the status of all accounts which were previously banned to Active or Closed.
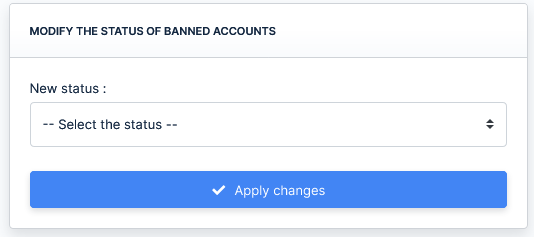
- MODIFY THE STATUS OF CLSOED ACCOUNTS – allows you to switch the status of all accounts which were previously closed to Active or Banned.

- MODIFY THE STATUS OF ACTIVE ACCOUNTS – allows you to switch the status of active to Closed or Banned. For this section you also have a filter available which allows you to select different types of active accounts as follows :
- All active accounts
- Accounts inactive for more than 3 months
- Accounts inactive for more than 6 months
- Accounts inactive for more than 12 months

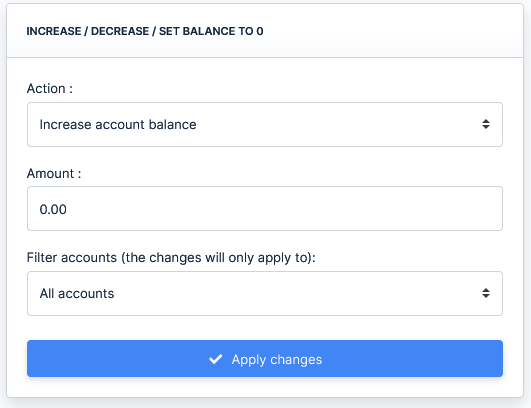
- INCREASE / DECREASE / SET BALANCE TO 0 – allows you to make mass modifications to the balance of users.
Available actions :- Increase account balance – the amount of money the users have will be increased by your specified amount
- Decrease account balance – the amount of money the users have will be decreased by your specified amount
- Set balance to 0 – the amount of money the users have will be set to 0
You can choose to make these modifications only to a predefined group such as :- All accounts
- Active accounts
- Closed accounts
- Banned accounts
- Accounts active in the past month
- Accounts active in the past 2 months
- Accounts active in the past 3 months
- Accounts inactive for more than 3 months
- Accounts inactive for more than 6 months
- Accounts inactive for more than 12 months
.
Edit websites
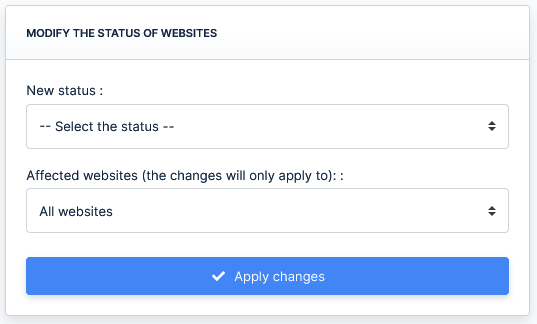
This page allows you to do mass changes to the status of websites or mass removals.
MODIFY THE STATUS OF WEBSITES– Allows you to instantly modify the status of websites to either “Active” or “Denied” based on the following filters :- All websites
- Pending websites
- Active websites
- Denied websites
- Websites of active accounts
- Websites of closed accounts
- Websites of banned accounts
WEBSITE REMOVALS– Allows you to instantly remove websites based on the following filters :- All websites
- Pending websites
- Active websites
- Denied websites
- Websites of active accounts
- Websites of closed accounts
- Websites of banned accounts

.
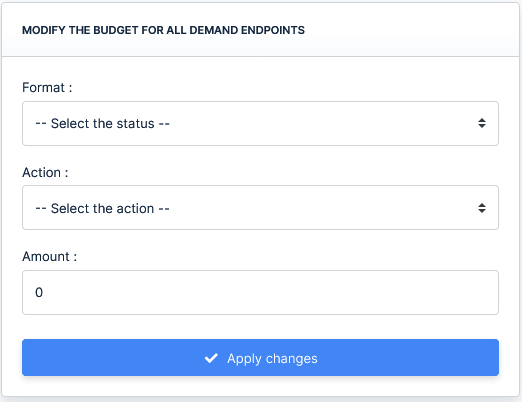
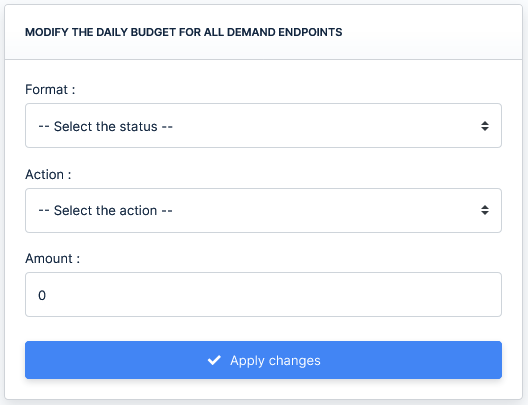
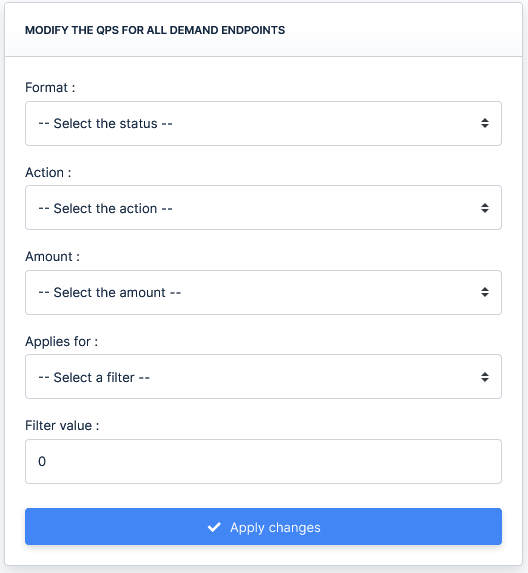
Edit demand endpoints
This page allows you to do mass changes to the budget, daily budget, revenue share and QPS of demand endpoints as follows :
MODIFY THE BUDGET FOR ALL DEMAND ENDPOINTS– Allows you to do mass changes to the budgets of your demand endpoints based on a specific ad format.
Available actions- Increase budget by – increases the budget by your specified amount
- Decrease budget by – decreases the budget by your specified amount
- Set budget to – sets the budget to your specified amount
MODIFY THE DAILY BUDGET FOR ALL DEMAND ENDPOINTS– Allows you to do mass changes to the daily budgets of your demand endpoints based on a specific ad format.
Available actions- Increase daily budget by – increases the daily budget by your specified amount
- Decrease daily budget by – decreases the daily budget by your specified amount
- Set daily budget to – sets the daily budget to your specified amount
MODIFY THE REVENUE SHARE FOR ALL DEMAND ENDPOINTS– Allows you to do mass changes to revenue share of your demand endpoints based on a specific ad format.
Available actions- Increase revenue share by – increases the revenue share by your specified amount
- Decrease revenue share by – decreases the revenue share by your specified amount
- Set revenue share to – sets the revenue share to your specified amount
Available filters ( Applies for )- Win rate lower than – the action is applied only for demand endpoints with a win rate lower than your specified value
- Win rate greater than – the action is applied only for demand endpoints with a win rate greater than your specified value
- eCPM lower than – the action is applied only for demand endpoints with an eCPM lower than your specified value
- eCPM greater than – the action is applied only for demand endpoints with an eCPM greater than your specified value

MODIFY THE QPS FOR ALL DEMAND ENDPOINTS– Allows you to do mass changes to QPS of your demand endpoints based on a specific ad format.
Available actions- Increase QPS by – increases the QPS by your specified amount
- Decrease QPS by – decreases the QPS by your specified amount
- Set QPS to – sets the QPS to your specified amount
Available filters ( Applies for )- Win rate lower than – the action is applied only for demand endpoints with a win rate lower than your specified value
- Win rate greater than – the action is applied only for demand endpoints with a win rate greater than your specified value
- eCPM lower than – the action is applied only for demand endpoints with an eCPM lower than your specified value
- eCPM greater than – the action is applied only for demand endpoints with an eCPM greater than your specified value
.
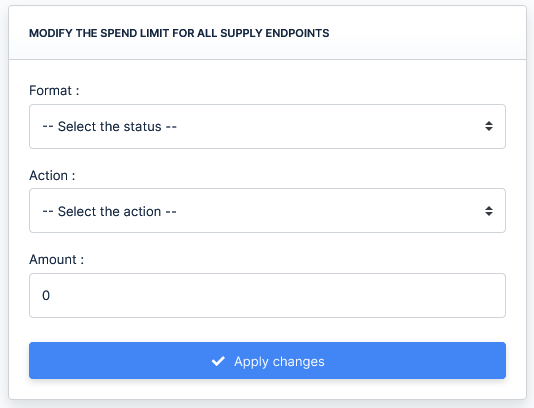
Edit supply endpoints
This page allows you to do mass changes to the budget, daily budget, revenue share and QPS of supply endpoints as follows :
MODIFY THE SPEND LIMIT FOR ALL SUPPLY ENDPOINTS– Allows you to do mass changes to the spend limit of your supply endpoints based on a specific ad format.
Available actions- Increase spend limit by – increases the spend limit by your specified amount
- Decrease spend limit by – decreases the spend limit by your specified amount
- Set spend limit to – sets the spend limit to your specified amount
MODIFY THE DAILY SPEND LIMIT FOR ALL DEMAND ENDPOINTS– Allows you to do mass changes to the daily spend limit of your supply endpoints based on a specific ad format.
Available actions- Increase daily spend limit by – increases the daily spend limit by your specified amount
- Decrease daily spend limit by – decreases the daily spend limit by your specified amount
- Set daily spend limit to – sets the daily spend limit to your specified amount

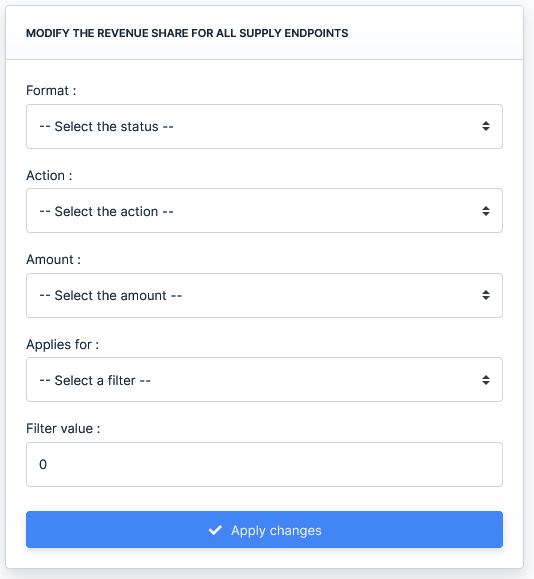
MODIFY THE REVENUE SHARE FOR ALL SUPPLY ENDPOINTS– Allows you to do mass changes to revenue share of your supply endpoints based on a specific ad format.
Available actions- Increase revenue share by – increases the revenue share by your specified amount
- Decrease revenue share by – decreases the revenue share by your specified amount
- Set revenue share to – sets the revenue share to your specified amount
Available filters ( Applies for )- Win rate lower than – the action is applied only for supply endpoints with a win rate lower than your specified value
- Win rate greater than – the action is applied only for supply endpoints with a win rate greater than your specified value
- eCPM lower than – the action is applied only for supply endpoints with an eCPM lower than your specified value
- eCPM greater than – the action is applied only for supply endpoints with an eCPM greater than your specified value
MODIFY THE QPS FOR ALL SUPPLY ENDPOINTS– Allows you to do mass changes to QPS of your supply endpoints based on a specific ad format.
Available actions- Increase QPS by – increases the QPS by your specified amount
- Decrease QPS by – decreases the QPS by your specified amount
- Set QPS to – sets the QPS to your specified amount
Available filters ( Applies for )- Win rate lower than – the action is applied only for supply endpoints with a win rate lower than your specified value
- Win rate greater than – the action is applied only for supply endpoints with a win rate greater than your specified value
- eCPM lower than – the action is applied only for supply endpoints with an eCPM lower than your specified value
- eCPM greater than – the action is applied only for supply endpoints with an eCPM greater than your specified value

.
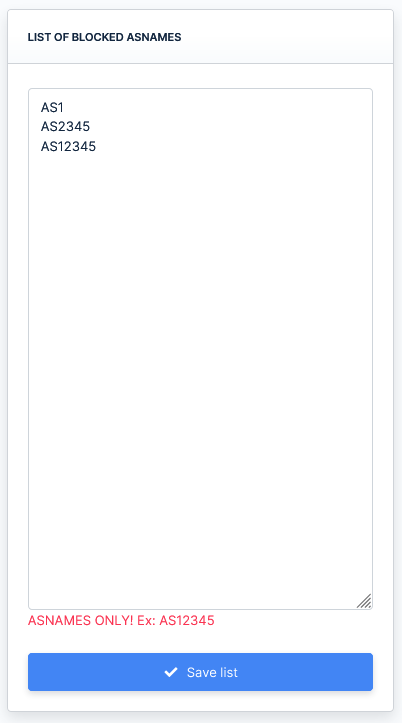
Custom filters
This page allows you to save your own personalized blocklists based on IP addresses, IP ranges and ASNAMEs. Enabling the usage of these lists when your feeds are being interrogated can be done via the platform settings as explained in the Available settings section of the documentation. A full guide to using all the available filters of the platform can be found in the Traffic filters section of the documentation.
LIST OF BLOCKED IP ADDRESSES– allows you to block individual IPv4 addresses. When modifying the list, add 1 per line.
LIST OF BLOCKED IP NETMASKS– allows you to block IPv4 netmasks ( IP ranges ). When modifying the list, add 1 IP netmask per line.
LIST OF BLOCKED ASNAMES– allows you to block ASNAMEs. When modifying the list, add 1 ASNAME per line.